Used as filter material when treating water and wastewater.
אבק זכוכית יכול להיות מאוד יעיל, וקשה להוציא אותו אחרי שאתה נושם אותו לתוך הריאות. זה יגרום לנזק גדול לגוף במשך הזמן. לבישת מסכ N95 היא דרישה בסיסית. אם יש לך מסך P100 בבית, ההגנה תהיה טובה יותר והאבק יכול להיחסם מחוץ לגוף.
הוסף נושא טקסט שלך כאן
זיכרו לקשור את הכפפות בצמידות כדי למנוע זבל מלגיש בצד זרועותיכם; בחר נעליים עם רגליים לא דוחות. אם ידיכם רטובות והבקבוק נשטף, אתם לא צריכים לדאוג שיפגע ברגליכם, שזה שכבה נוספת של הגנה.
גם עליכם "להתייחס" לסביבה הפועלת
- אווירה + הסרת אבק: מצא מקום עם תנועת אוויר טובה לעבוד, ושם רוחף קטן לצדו כדי לנשוף לעבר מיקום הבריחה כדי לנשוף את האבק בזמן ולהפחית את הסיכון להכנסה. שם כרית ישנה על השולחן, וזה גם נוח לנקות את הזבל אחרי הבריחה, כדי שלא יהיה סביב.
- צריך להכין רפואה ראשונה: שמרו על תיק הרפואה הראשונה לידכם מראש! אם נגעתם לכם בשכם, רחץו את הפצע במים נקיים תחילה, ואל תשתמשו באצבעות כדי לבחור את שברי הזכוכית הקטנים שנקלעו בגוף. אם הדימום אינו נעצר, אל תהססו, הלכו מייד למוסד רפואי לטיפול, ואל תהיו רגועים עם פצעים קטנים.
- עם הזהירויות הבטיחותיות האלה, אתם יכולים לברוח חורים בשקט ובנוחות. אחרי כל, התנאי הקדמון ליצירתיות הוא להגן על עצמכם. כך, תהיו יותר בטוחים כשמתמודדים עם בקבוקי זכוכית. חופשיים לנסות טכניקות שונות בנוגע לחיבור חור בבקבוק זכוכית~ בחירת כלים נכונה תפתור חצי מהבעיות
המסור חייב להיות "מיוחד לזכוכית"
Don’t even think about ordinary metal drill bits and woodworking drill bits. Once placed on the glass, it will slip and easily crack the top of the glass. You have to choose a diamond drill bit-this drill bit has a layer of fine diamond particles on the surface, like countless small grinding heads, which can “gnaw” the glass little by little and is not easy to crack.
There are two types of drill bits: if you want to drill small holes (such as threading), choose solid ones, and if you want to drill large holes (such as plugging in light bulbs), choose hollow ones. Buy according to the hole diameter you want, and don’t force yourself to use a small drill bit to expand the hole, which is easy to crack.
- The drilling machine must be "stable" It is best for beginners to use a bench drill. The machine is fixed on the table, the drill bit will not shake, and it can drill down steadily and vertically; if you only have a hand drill, remember to practice on waste bottles first, don’t shake your arms when holding the drill, let the drill bit face the bottle vertically, and don’t use an impact drill – the glass can’t withstand the “bang bang bang” vibration, and it will break as soon as it is drilled.
- Cooling! Cooling! Cooling! This is the most easily overlooked, but the most critical step. The friction heat during drilling will heat up the glass, and water must be used to cool it down, just like “cooling down” the glass.
- Simple method: take a dropper and drip a few drops of water into the drilling point from time to time to keep the surface wet; or use plasticine to pinch a small “wall” around the drilling point, pour some water into it, form a small pool, and let the drill bit always soak in water to work; if it is troublesome, just soak the lower half of the bottle in a basin of water and drill (don’t soak it all, otherwise it will be difficult to hold), but be careful not to let the water splash into the switch of the electric drill. Practical steps: Slow down, and then go slower
- Fix the bottle firmly and don't let it "run around" Find a rubber mat (you can cut a piece of yoga mat) and put it on the table, and put the bottle on it, so it is not easy to slip; then use two wooden boards to clamp the bottle, and put a layer of cloth between the wooden boards and the bottle to prevent marks from being clamped. Don’t tighten the clamp too much, just use a little force to fix it, too much force will crack the bottle – imagine the strength of holding an egg, it’s almost the same feeling.
Mark the position so that the drill bit "does not get lost"
- First, use a marker to draw a small dot where you want to drill, then cut a piece of masking tape and stick it on it (ordinary tape is too sticky and may remove glass slag when you tear it off). The tape not only prevents the drill bit from slipping, but also makes the mark clearer. When drilling, just stare at the point in the middle of the tape to prevent it from being distorted. Start drilling: Remember "low speed, light pressure, and frequent water addition"
- When turning on the electric drill, first adjust it to a low speed gear, and the speed should not exceed 1000 rpm (about 1/3 of the speed of the electric drill). If it is too fast, the heat cannot be dissipated. Let the drill bit gently touch the marked point of the tape. Don’t press down hard, just rely on the weight of the drill bit to grind slowly – the harder you push, the easier it is for the glass to crack, just like scratching the glass with your fingernails. Scratch it gently and it will be stable, but push it hard and it will slip easily.
Keep an eye on the drilling point throughout the process. Stop drilling and add water when there is less water. Don’t grind dry! The drill bit will get hot during dry grinding, and the glass will heat up locally. When you add water, the hot and cold will cause it to crack with a “click”.
When you are halfway through drilling, you can see that the glass on the other side is a little bulging. At this time, don’t be too quick. Either lift the drill bit gently to let the water in to cool it down, or simply turn the bottle over and continue drilling from the other side – this can avoid the glass at the exit from “breaking” when you finally drill through.
The last step: grind the edges smooth
The edges of the drilled holes must be a little sharp, and it will hurt to touch them with your hands. Find a piece of fine sandpaper (400 mesh or more), dip it in water and polish it gently, or use a diamond file to trim it little by little until the edge feels smooth, which is both safe and beautiful.
The most common pitfalls for novices
If you want to learn how to drill a hole in a glass bottle, you should avoid these pitfalls that novices often step on in advance, otherwise the good bottle will crack at any time, and your efforts will be in vain!
Don't be in a hurry, slow work makes fine work
Some people think that “drilling faster can save time”, but as soon as the speed is increased, the glass will crack with a “click”. Drilling holes in glass is like making soup, which needs to be simmered over low heat. It is normal to drill a small hole for three to five minutes, so don’t be in a hurry. Grind slowly and let the drill bit and glass “live in peace” so that you can drill a beautiful hole steadily.
Leave enough distance from the edge to prevent the bottle from "breaking"
The drilling point must be at least 1.9 cm (about the length of a finger joint) away from the edge of the bottle! If it is too close to the edge, the glass “can’t use its strength” and may crack from the edge halfway through drilling. Don’t be bothered, measure the distance before starting, so that the bottle can withstand the pressure of drilling.
Replace the drill bit when it is blunt, don’t make do with it
After using the diamond drill bit for a long time, the small particles on the surface will be worn away and become “blunt”. If you continue to use it at this time, it will not only drill slowly, but also slip easily, not only will the hole be drilled crooked, but the glass will also suffer. Replace the drill bit when it is time, don’t be stingy with this little money, a new drill bit will allow you to drill smoothly.
Practice with waste bottles first, then touch the "baby bottle"
For the first time drilling, don’t use your favorite bottle directly! Find an empty soy sauce bottle or beverage bottle to try the water first, feel how to control the strength of the drill bit, and when to add water to cool it down. Practice two or three more times, find out the rules, and then start with the bottle you like, the success rate will double directly, and you don’t have to worry about damaging the beautiful bottle.
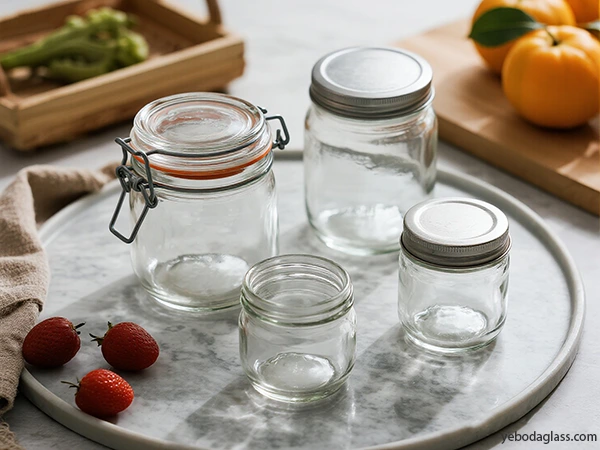
In fact, if you master how to drill a hole in a glass bottle, you will find that drilling a hole in a glass bottle is not as difficult as you imagined. If you are worried that the quality of the bottle will affect the effect, try YEBODA’s glass bottles. They have uniform wall thickness, few impurities in the glass, are stable when drilling, and are not easy to crack. It is also safer for beginners to use. Just be bold and use your creativity!
התחל חיפוף: זיכרו "מהירות נמוכה, לחץ קל והוספת מים תכופה"
- כשמפעילים פטיש חשמלי, ראשית נדחיף אותו לגירוס מהירות נמוכה, והמהירות לא תעלה על 1000 סל"ד (כשליש ממהירות הפטיש החשמלי). אם היא יותר מהר, החום לא יכול להתפרק.
- הנהן את הקרס הלוחץ על נקודת הסימון של הרצועה. אל תדחיף חזק, רק תלוי במשקל הקרס הלוחץ כדי לטחון לאט – ככל שתדחיף יותר, קל יותר עבור הזכוכית להינשר, כמו שלשוחות עם הציפורן שלכם. שוחה בעדינות והיא תהיה יציבה, אבל דחפו חזק והיא תסחוף בקלות.
- שמר עין על נקודת החיפוף במהלך כל התהליך. עצר חיפוף והוסף מים כשיש מעט מים. אל תטחון ביבש! הקרס יתחמם בטחיפה יבשה, והזכוכית תתחמם באזור מקומי. כשאתם מוסיפים מים, החום והקרח יגרום לה להינשר עם "קליק".
- כשאתם באמצע החיפוף, אתם יכולים לראות שהזכוכית מהצד האחר קצת מתרוממת. בשלב הזה, אל תהיה מהיר מדי. או הנהן את הקרס בעדינות כדי לתת למים להכנס כדי לקרר אותו, או פשוט הפוך את הבקבוק ולהמשיך לחפוף מהצד האחר – זה ימנע את הזכוכית מהצד היצא להינשר "כשאתם סוף סוף חופפים דרך".
השלב האחרון: טחון את הקצוות חלקים
הקצוות של חורי החיפוף חייבים להיות קצת חדים, וזה יכול לפגוע כשמגעים בהם בידיים. מצא חתיכה של נייר גיר דק (400 רשומות או יותר), צליל אותו במים וטחון בעדינות, או השתמש במחרטת יהלום כדי לחתוך לקטין עד שהקצה ירגיש חלק, מה שהוא גם בטוח וגם יפה.
התקלות הנפוצות ביותר עבור מתחילים
אם אתם רוצים ללמוד איך לחפוף חור בבקבוק זכוכית, עליכם להימנע מהתקלות שמתחילים עלולים לפספס במוקדם, אחרת הבקבוק הטוב עלול להינשר בכל רגע, והמאמצים שלכם יהיו חסרי תועלת!
אל תהיה מהיר, עבודה איטית יוצרת עבודה טובה
כמה אנשים חושבים ש“לבצע חיתוך מהר יכול לחסוך זמן”, אבל ברגע שמאיצים את המהירות, הזכוכית תשבר עם “קליק”. לחיתוך חורים בזכוכית דומה להכנת מרק, שדורש גינון על נר נמוך. זה נכון לחתוך חור קטן במשך שלושה עד חמש דקות, אז אל תמהר. חתוך לאט ותנהן למסר החיתוך והזכוכית “לחיות בשלום” כך שתוכל לחתוך חור יפה באופן יציב.
השאר מרחק מספיק מהקצה כדי למנוע את הבקבוק מ“להישבר”
הנקודת החיתוך חייבת להיות לפחות 1.9 ס”מ (כמו אורך חיבור האצבעות) מהקצה של הבקבוק! אם הוא קרוב מדי לקצה, הזכוכית “אינה יכולה להשתמש בכוחה” ועלולה לשבר מהקצה באמצע החיתוך. אל תתעצב, מדוד את המרחק לפני שאתה מתחיל, כדי שהבקבוק יוכל לשרוד את לחץ החיתוך.
החליף את חוט החיתוך כשהוא דקור, אל תתנפק עם זה
אחרי שאתה משתמש בחוט חיתוך דיאמונד למשך זמן מה, החלקיקים הקטנים על פני השטח יישחקו וייעשו “דקורים”. אם אתה ממשיך להשתמש בהם בזמן הזה, הוא לא רק יחתוך לאט, אלא גם יחליק בקלות, לא רק שהחור ייחתך לא ישר, אלא הזכוכית גם תסבול. החליף את חוט החיתוך כשזה הזמן, אל תהי חסכן בכסף הקטן הזה, חוט חיתוך חדש יאפשר לך לחתוך בצורה חלקה.
רכש ניסיון תחילה עם בקבוקים ידועים, ואז תגיע ל“בקבוק התינוק”
בפעם הראשונה לחיתוך, אל תשתמש בבקבוק האהוב שלך ישירות! מצא בקבוק סויא רידם או בקבוק משקאות לנסות את המים תחילה, תרגיש כיצד לשלוט בעוצמת חוט החיתוך, ומתי להוסיף מים כדי לצנן אותו. אימן עוד פעמיים או שלוש, תגלה את הכללים, ואז תחליף בבקבוק שאתה אוהב, השכיפות תדרוף ישירות, ולא תצטרך לפחד שתפגע בבקבוק היפה.
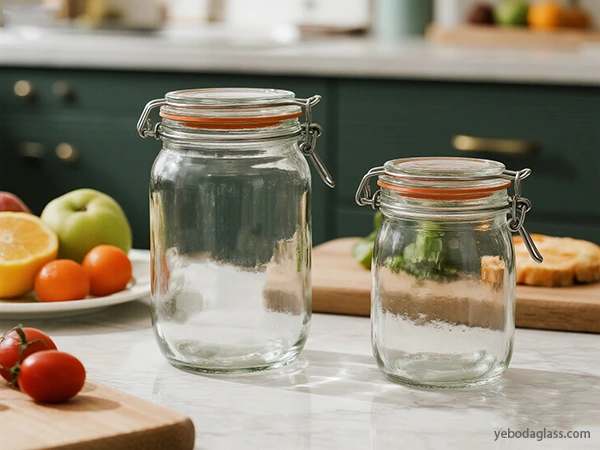
למעשה, אם תלמד כיצד לחתוך חור בבקבוק זכוכית, תגלה שחיתוך חור בבקבוק זכוכית אינו כזה קשה כמו שחשבת. אם אתה מפחד שאיכות הבקבוק תשפיע על התוצאה, נסה בקבוקי זכוכית של YEBODA. יש להם עובי דפן שווה, מעט זיהומים בזכוכית, הם יציבים כשמחתכים בהם, והם לא נשברים בקלות. זה גם בטוח יותר למתחילים להשתמש בהם. רק תהי נועז ותשתמש בדמיונך!
קישור
כעת שלמדת כיצד לקדוח בור בבקבוק זכוכית בצעד צעד, זה הזמן להתחיל על דרך DIY יצירתית ומעניינת! בין אם זה יצירת מנורת לילה מיוחדת, יצירת כד גידול קטן אישי, או הפיכת בקבוק מי יד שמן ייחודי, ניתן להתארגן~ אבל זיכרו, הצעד הראשון להצלחה הוא לבחור בקבוק נכון!
למה רבים מהמומחים בDIY אוהבים לבחור בקבוקים YEBODA? מכיוון שבקבוקי הזכוכית שלנו עשויים מחומרים חזקים, עבים מספיק, איכותיים, ובמיוחד עמידים, הם מאוד מתאימים לקידוח, יצירת ידיעה, ושימוש חוזר! בין אם אתם חדשים או מומחים ביצירת ידיעה, עמידות, שקיפות ויציבות של בקבוקי YEBODA יכולים לתמוך בבטחה ברעיונות המרשימים שלכם, ולהפוך את העבודה לבטוחה ויפהפייה, ולממש בדיוק את היצירתיות שלכם~
כשאתם שואפים לאיכות, בחרו YEBODA! אחרי כל העניין, כשאתם לומדים כיצד לקדוח בור בבקבוק זכוכית, בחירת הבקבוק הנכון יכולה להשפיע מאוד על כל התהליך והתוצאות, ולעזור לכם להפוך את ההשראה הידידותית שלכם לעצמים מרשימים~